> ## Documentation Index
> Fetch the complete documentation index at: https://docs.parea.ai/llms.txt
> Use this file to discover all available pages before exploring further.
# Evaluation
> Test & evaluate your LLM application
This guide walks you through the process of evaluating your LLM application step-by-step.
We assume that you are comfortable running experiments in Python or TypeScript and have an API key.
If you haven't already, make sure to read the [evaluation quickstart](/welcome/getting-started-evaluation) first.
 ## Conceptualizing Testing & Evaluating LLM Applications
Because LLMs have non-deterministic behavior, it's critical to understand the accuracy of your LLM app while you're developing, and before you ship.
It's also important to track performance over time.
It's unlikely that you'll ever hit 100% correctness, but it's important that for the metrics you care about, you're steadily improving.
Parea's experiments allow you to capture this into a simple, effective workflow that enables you ship more reliable, higher quality products.
To evaluate your LLM app, you need some data (10 samples are sufficient) and a function that executes a task.
Your data need to contain the inputs to the function as key-value pairs and can optionally contain a ground truth value for that sample (indicated by the key `target`).
While 10 samples are sufficient to get started, it's useful to continue to add more samples whenever you identify new failure cases from your production traffic.
The goal of evaluation is to assess each of component and improve them over time.
In practice, it's better to assume for that your data is noisy, the LLM is imperfect, and evaluation methods are a little bit wrong.
## Evaluation Metrics
You can either use pre-built SOTA evaluation metrics or define your own custom evaluation metrics.
You can use evaluation metrics by attaching them via the `trace` decorator to your function.
This will automatically execute the evaluation metric on the output of the function in non-blocking in the background after the function execution has finished.
You can apply evaluations at any "level" of your application by attaching them to the corresponding function decorated with `trace`.
This is useful to understand the quality at different levels of granularity ("Was the right context extracted?" vs. "Was the answer correct?").
### Using Pre-built SOTA Evaluations
Parea provides a set of state-of-the-art evaluation metrics you can plug into your evaluation process.
Their motivation & research are discussed in the blog post on [reference-free](/blog/eval-metrics-for-llm-apps-in-prod)
and [reference-based](/blog/llm-eval-metrics-for-labeled-data) evaluation metrics. Here is an overview of them:
* `levenshtein`: calculates the number of character-edits in the generated output to match the target and normalizes it by the length of the output; more [here](/api-reference/sdk/python#levenshtein)
* `llm_grader`: leverages a general-purpose zero-shot prompt to rate responses from an LLM to a given question on a scale from 1-10; more [here](/api-reference/sdk/python#llm-grader-factory)
* `answer_relevancy`: measures how relevant the generated response is to the given question; more [here](/api-reference/sdk/python#answer-relevancy-factory)
* `self_check`: measures how well the LLM call is self consistent when generating multiple responses; more [here](/api-reference/sdk/python#self-check)
* `lm_vs_lm_factuality`: uses another LLM to examine original LLM response for factuality; more [here](/api-reference/sdk/python#lm-vs-lm-factuality-factory)
* `semantic_similarity`: calculates the cosine similarity between output and ground truth; more [here](/api-reference/sdk/python#semantic-similarity-factory)
* `context_query_relevancy`: calculates the percentage of sentences in the context are relevant to the query; more [here](/api-reference/sdk/python#context-query-relevancy-factory)
* `context_ranking_pointwise`: measures how well the retrieved contexts are ranked by relevancy to the given query by pointwise estimation; more [here](/api-reference/sdk/python#context-ranking-pointwise-factory)
* `context_ranking_listwise`: measures how well the retrieved contexts are ranked by relevancy to the given query by listwise estimation; more [here](/api-reference/sdk/python#context-ranking-listwise-factory)
* `context_has_answer`: classifies if the retrieved context contains the answer to the query; more [here](/api-reference/sdk/python#context-has-answer-factory)
* `answer_context_faithfulness_binary`: classifies if the answer is faithful to the context; more [here](/api-reference/sdk/python#answer-context-faithfulness-binary-factory)
* `answer_context_faithfulness_precision`: calculates how many tokens in the generated answer are also present in the retrieved context; more [here](/api-reference/sdk/python#answer-context-faithfulness-precision-factory)
* `answer_context_faithfulness_statement_level`: calculates the percentage of statements from the generated answer that can be inferred from the context; more [here](/api-reference/sdk/python#answer-context-faithfulness-statement-level-factory)
* `goal_success_ratio`: measures how many turns a user has to converse on average with your AI assistant to achieve a goal; more [here](/api-reference/sdk/python#goal-success-ratio-factory)
* `factual_inconsistency_binary`: classifies if a summary is factually inconsistent with the original text; more [here](/api-reference/sdk/python#factual-inconsistency-binary-factory)
* `factual_inconsistency_scale`: grades the factual consistency of a summary with the article on a scale from 1 to 10; more [here](/api-reference/sdk/python#factual-inconsistency-scale-factory)
* `likert_scale`: grades the quality of a summary on a Likert scale from 1-5 along the dimensions of relevance, consistency, fluency, and coherence; more [here](/api-reference/sdk/python#likert-scale-factory)
Sometimes the exposed evaluation metrics are actually factory methods that return the evaluation metric.
This is needed to configure the evaluation metric to your use case.
```python no_factory_method.py theme={null}
from parea import trace
from parea.evals.general import levenshtein
# annotate function with the trace decorator and pass the evaluation function(s)
@trace(eval_funcs=[levenshtein])
def greeting(name: str) -> str:
return f"Hello {name}"
# define the experiment and run it
p.experiment(...)
```
```python factory_method.py theme={null}
from parea import trace
from parea.evals.general import semantic_similarity_factory
# instantiate the evaluation metric from the factory
semantic_similarity = semantic_similarity_factory(embd_model="text-embedding-3-small")
# annotate function with the trace decorator and pass the evaluation function(s)
@trace(eval_funcs=[semantic_similarity])
def greeting(name: str) -> str:
return f"Hello {name}"
# define the experiment and run it
p.experiment(...)
```
### Custom Evaluations
You can also define your own evaluation metrics. They can be as simple as checking if a certain word is in the output as shown below.
```python Python theme={null}
from parea import trace
from parea.schemas import Log
def eval_harmfulness(log: Log):
return not "bad word" in log.output:
@trace(eval_funcs=[eval_harmfulness])
def experiment_entry_point(msg: str) -> str:
return "good word"
```
```typescript TypeScript theme={null}
import { Log, trace } from "parea-ai";
function evalHarmfulness(log: Log): boolean {
return !log.output.includes("bad word");
}
const experimentEntryPoint = trace(
"experimentEntryPoint",
(msg: string): string => {
return "good word";
},
{ evalFuncs: [evalHarmfulness] }
);
```
To ensure that your evaluation metrics are reusable across the entire Parea ecosystem, and with any LLM models or LLM use cases, we introduced the `log` parameter.
All evaluation functions accept the `log` parameter, which provides all the needed information to perform an evaluation.
Evaluation functions are expected to return floating point scores or booleans.
```python theme={null}
class Role(str, Enum):
user = "user"
assistant = "assistant"
system = "system"
class Message:
content: str
role: Role
class ModelParams:
temp: float = 1.0
top_p: float = 1.0
frequency_penalty: float = 0.0
presence_penalty: float = 0.0
max_length: Optional[int] = None
response_format: Optional[dict] = None
class LLMInputs:
# the name of the LLM model. e.g. "gpt-4-1106-preview", "claude-2", etc.
model: Optional[str]
# the name of the LLM provider.
# One of: ["openai", "azure", "anthropic",
# "anyscale", "aws", "vertexai", "openrouter"]
provider: Optional[str]
# the model specific parameters for the LLM call
model_params: Optional[ModelParams]
# the prompts that make up the LLM call,
# e.g. [{"role": "user", "content": "What is the capital of France?"}]
messages: Optional[list[Message]]
# a list of function call JSON schemas following OpenAI format
functions: Optional[list[dict[str, str]]
# the name of the function the LLM should call or auto.
# e.g {"name": "current_weather"} or "auto"
function_call: Optional[Union[str, dict[str, str]]]
class Log:
# all the parameters send the LLM provider
configuration: Optional[LLMInputs]
# The key-value pairs representing an input name
# and the corresponding value,
# e.g. {"query": "What is the capital of France?"}
inputs: Optional[dict[str, str]]
# The output of the LLM call
output: Optional[str]
# The target/ground truth value for the LLM call
target: Optional[str]
```
#### Skipping Evaluation Metrics
Sometimes it's useful to apply evaluation metrics only on a subset of the data.
For that, you return `None`/`null` in the evaluation function to skip the evaluation for that log.
```python Python theme={null}
def my_eval_name(log: Log):
if log.inputs.get("key") == "value-to-skip":
return None
return log.output == log.target
```
```typescript TypeScript theme={null}
function myEvalName(log: Log): boolean | null {
if (log.inputs.key === "value-to-skip") {
return null;
}
return log.output === log.target;
}
```
#### Return a Reason
While numerical scores are useful to get a fast grasp of how good a response is, it's useful to provide a reason for why a response is bad.
Especially, if one uses a LLM-based evaluation metric, it's good to pass on the reasons for why the LLM assigned a certain score.
You can do that by returning an `EvaluationResult` object with a `reason` attribute.
Updating above example:
```python Python theme={null}
def eval_harmfulness(log: Log) -> EvaluationResult:
if "bad word" in log.output:
return EvaluationResult(name="harmfulness", score=0.0, reason="bad word found")
return EvaluationResult(name="harmfulness", score=1.0)
@trace(eval_funcs=[eval_harmfulness])
def experiment_entry_point(msg: str) -> str:
return "good word"
```
```typescript TypeScript theme={null}
function evalHarmfulness(log: Log): EvaluationResult {
if (log.output.includes("bad word")) {
return { name: "harmfulness", score: 0.0, reason: "bad word found" };
}
return { name: "harmfulness", score: 1.0 };
}
const experimentEntryPoint = trace(
"experimentEntryPoint",
(msg: string): string => {
return "good word";
},
{ evalFuncs: [evalHarmfulness] }
);
```
The full-definition of the `EvaluationResult` object is as follows:
```python Python theme={null}
class EvaluationResult:
name: str
score: float
reason: Optional[str] = None
```
```typescript TypeScript theme={null}
type EvaluationResult = {
name: string;
score: number;
reason?: string;
};
```
#### Returning Multiple Scores
Sometimes there is shared work between different evaluation metrics such that returning multiple scores is better.
You can do that by returning a list of `EvaluationResult` objects.
## Running & Naming of Experiments
Depending on whether you use Python or TypeScript, you can name & run experiments in the below ways.
You need to name an experiment and can optionally specify the name of a particular run.
Note, that the run name can only contain alphanumeric characters, dashes, and underscores and needs to be unique within each project.
After an experiment is finished, you will see an overview of the average stats and a link to the experiment page with full details.
In Python, you can define an experiment by calling the `experiment` method of the Parea client `p` and run it by calling the `run` method of the experiment.
You can optionally specify the name of the run by passing it to the `run` method.
```python theme={null}
p.experiment(
name=experiment_name, # name of the experiment
data=data, # test data to run the experiment on (list of dicts)
func=func, # function to run (callable)
).run() # you can optionally specify the run name by passing `run_name` to the run method
```
Alternatively, you can also use the CLI to run an experiment:
```bash theme={null}
parea experiment path/to/experiment_file.py
```
In this case the experiment file should contain the experiment definition but not call the `run` method. You can optionally specify the run name of the experiment using the `--run_name` flag in the CLI.
```python theme={null}
p.experiment(
name=experiment_name, # name of the experiment
data=data, # test data to run the experiment on (list of dicts)
func=func, # function to run (callable)
)
```
In TypeScript, you can define an experiment by calling the `experiment` method of the Parea client `p` and run it by calling the `run` method of the experiment.
You can optionally specify the name of the experiment by passing it to the `run` method.
```typescript theme={null}
const e = p.experiment(
experimentName, // name of the experiment
data, // test data to run the experiment on (list of dicts)
func, // function to run (callable)
);
await e.run(); // you can optionally specify the run name by passing it to the run method
```
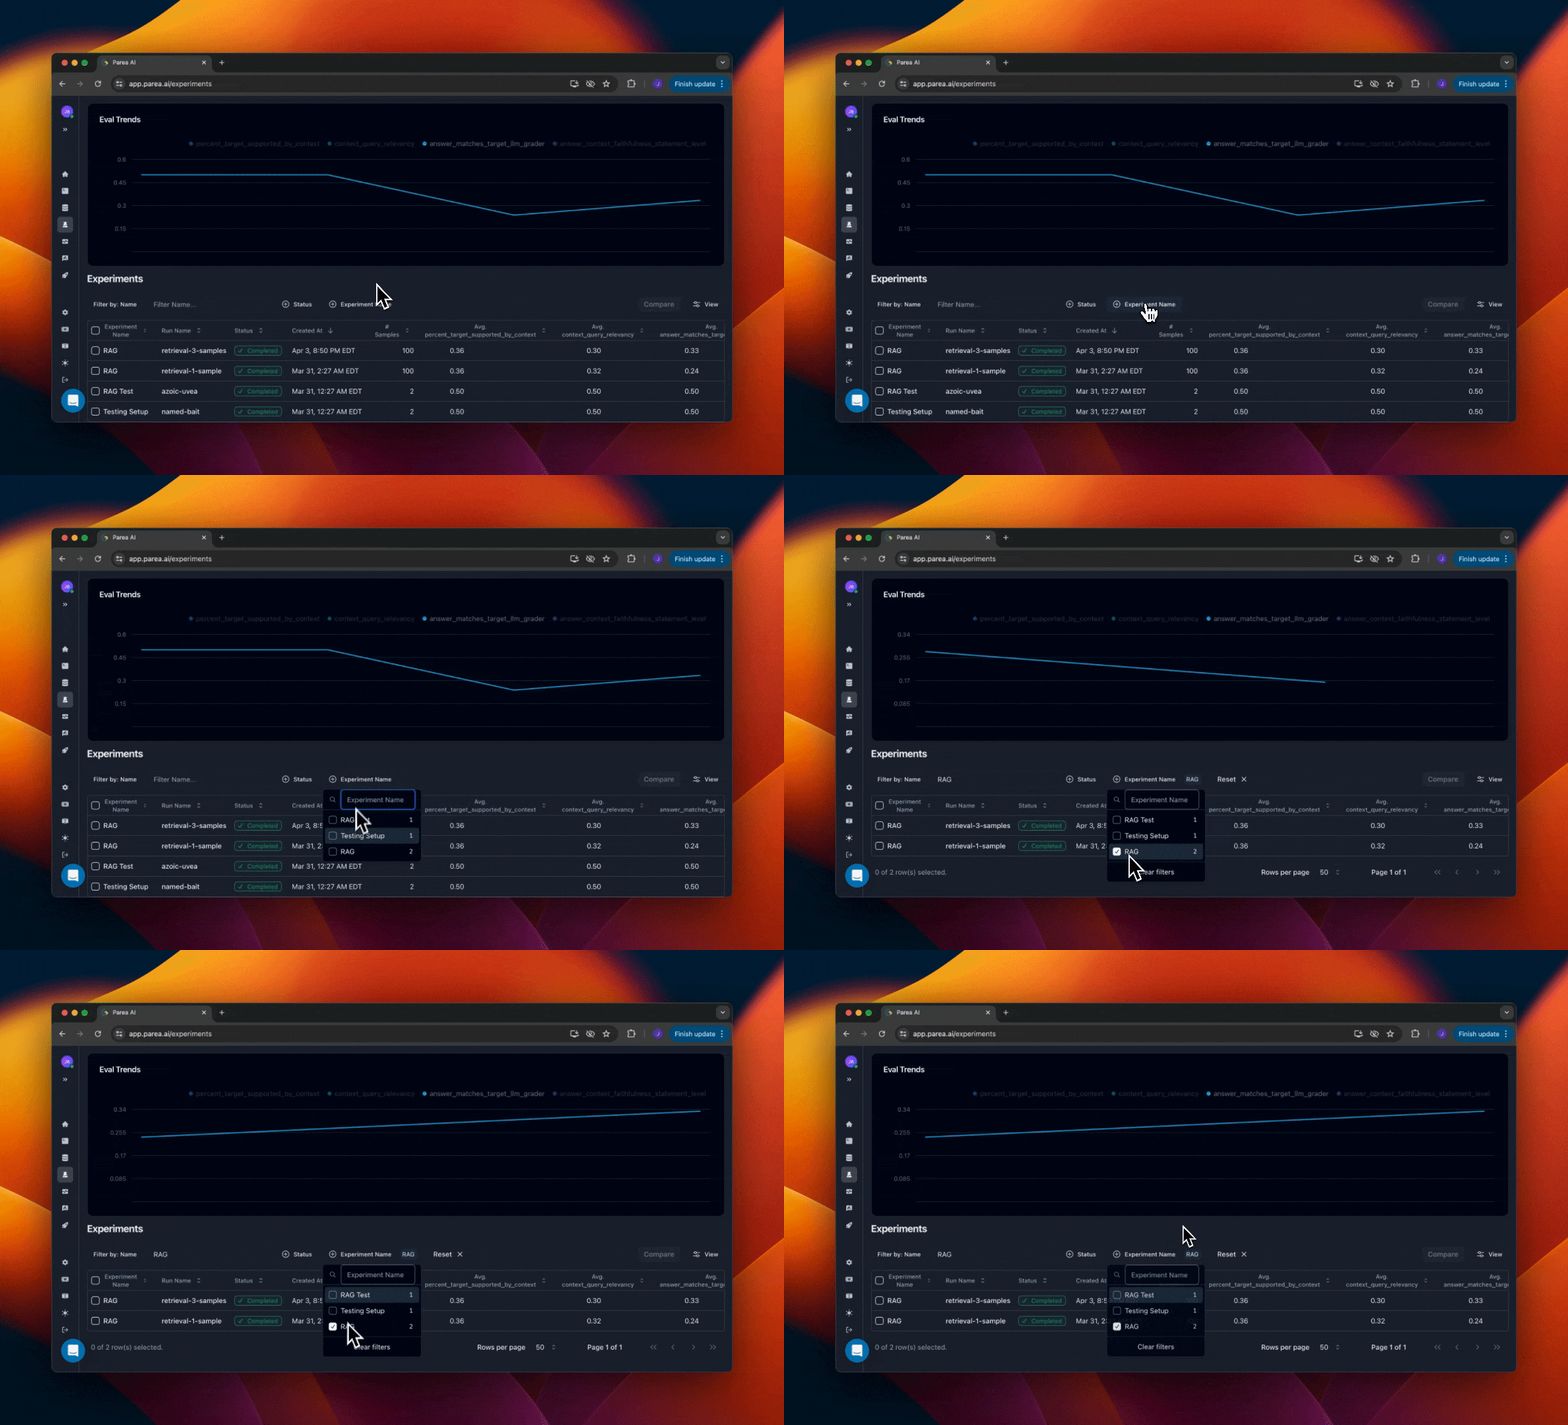
### Organization of Experiments & Historical Trends of Evals
Within projects, you can organize your experiments by the experiment name.
You can filter the experiments table by the experiment name to see all runs of that experiment.
This will also filter the graph of historical experiment eval scores by that name.
## Conceptualizing Testing & Evaluating LLM Applications
Because LLMs have non-deterministic behavior, it's critical to understand the accuracy of your LLM app while you're developing, and before you ship.
It's also important to track performance over time.
It's unlikely that you'll ever hit 100% correctness, but it's important that for the metrics you care about, you're steadily improving.
Parea's experiments allow you to capture this into a simple, effective workflow that enables you ship more reliable, higher quality products.
To evaluate your LLM app, you need some data (10 samples are sufficient) and a function that executes a task.
Your data need to contain the inputs to the function as key-value pairs and can optionally contain a ground truth value for that sample (indicated by the key `target`).
While 10 samples are sufficient to get started, it's useful to continue to add more samples whenever you identify new failure cases from your production traffic.
The goal of evaluation is to assess each of component and improve them over time.
In practice, it's better to assume for that your data is noisy, the LLM is imperfect, and evaluation methods are a little bit wrong.
## Evaluation Metrics
You can either use pre-built SOTA evaluation metrics or define your own custom evaluation metrics.
You can use evaluation metrics by attaching them via the `trace` decorator to your function.
This will automatically execute the evaluation metric on the output of the function in non-blocking in the background after the function execution has finished.
You can apply evaluations at any "level" of your application by attaching them to the corresponding function decorated with `trace`.
This is useful to understand the quality at different levels of granularity ("Was the right context extracted?" vs. "Was the answer correct?").
### Using Pre-built SOTA Evaluations
Parea provides a set of state-of-the-art evaluation metrics you can plug into your evaluation process.
Their motivation & research are discussed in the blog post on [reference-free](/blog/eval-metrics-for-llm-apps-in-prod)
and [reference-based](/blog/llm-eval-metrics-for-labeled-data) evaluation metrics. Here is an overview of them:
* `levenshtein`: calculates the number of character-edits in the generated output to match the target and normalizes it by the length of the output; more [here](/api-reference/sdk/python#levenshtein)
* `llm_grader`: leverages a general-purpose zero-shot prompt to rate responses from an LLM to a given question on a scale from 1-10; more [here](/api-reference/sdk/python#llm-grader-factory)
* `answer_relevancy`: measures how relevant the generated response is to the given question; more [here](/api-reference/sdk/python#answer-relevancy-factory)
* `self_check`: measures how well the LLM call is self consistent when generating multiple responses; more [here](/api-reference/sdk/python#self-check)
* `lm_vs_lm_factuality`: uses another LLM to examine original LLM response for factuality; more [here](/api-reference/sdk/python#lm-vs-lm-factuality-factory)
* `semantic_similarity`: calculates the cosine similarity between output and ground truth; more [here](/api-reference/sdk/python#semantic-similarity-factory)
* `context_query_relevancy`: calculates the percentage of sentences in the context are relevant to the query; more [here](/api-reference/sdk/python#context-query-relevancy-factory)
* `context_ranking_pointwise`: measures how well the retrieved contexts are ranked by relevancy to the given query by pointwise estimation; more [here](/api-reference/sdk/python#context-ranking-pointwise-factory)
* `context_ranking_listwise`: measures how well the retrieved contexts are ranked by relevancy to the given query by listwise estimation; more [here](/api-reference/sdk/python#context-ranking-listwise-factory)
* `context_has_answer`: classifies if the retrieved context contains the answer to the query; more [here](/api-reference/sdk/python#context-has-answer-factory)
* `answer_context_faithfulness_binary`: classifies if the answer is faithful to the context; more [here](/api-reference/sdk/python#answer-context-faithfulness-binary-factory)
* `answer_context_faithfulness_precision`: calculates how many tokens in the generated answer are also present in the retrieved context; more [here](/api-reference/sdk/python#answer-context-faithfulness-precision-factory)
* `answer_context_faithfulness_statement_level`: calculates the percentage of statements from the generated answer that can be inferred from the context; more [here](/api-reference/sdk/python#answer-context-faithfulness-statement-level-factory)
* `goal_success_ratio`: measures how many turns a user has to converse on average with your AI assistant to achieve a goal; more [here](/api-reference/sdk/python#goal-success-ratio-factory)
* `factual_inconsistency_binary`: classifies if a summary is factually inconsistent with the original text; more [here](/api-reference/sdk/python#factual-inconsistency-binary-factory)
* `factual_inconsistency_scale`: grades the factual consistency of a summary with the article on a scale from 1 to 10; more [here](/api-reference/sdk/python#factual-inconsistency-scale-factory)
* `likert_scale`: grades the quality of a summary on a Likert scale from 1-5 along the dimensions of relevance, consistency, fluency, and coherence; more [here](/api-reference/sdk/python#likert-scale-factory)
Sometimes the exposed evaluation metrics are actually factory methods that return the evaluation metric.
This is needed to configure the evaluation metric to your use case.
```python no_factory_method.py theme={null}
from parea import trace
from parea.evals.general import levenshtein
# annotate function with the trace decorator and pass the evaluation function(s)
@trace(eval_funcs=[levenshtein])
def greeting(name: str) -> str:
return f"Hello {name}"
# define the experiment and run it
p.experiment(...)
```
```python factory_method.py theme={null}
from parea import trace
from parea.evals.general import semantic_similarity_factory
# instantiate the evaluation metric from the factory
semantic_similarity = semantic_similarity_factory(embd_model="text-embedding-3-small")
# annotate function with the trace decorator and pass the evaluation function(s)
@trace(eval_funcs=[semantic_similarity])
def greeting(name: str) -> str:
return f"Hello {name}"
# define the experiment and run it
p.experiment(...)
```
### Custom Evaluations
You can also define your own evaluation metrics. They can be as simple as checking if a certain word is in the output as shown below.
```python Python theme={null}
from parea import trace
from parea.schemas import Log
def eval_harmfulness(log: Log):
return not "bad word" in log.output:
@trace(eval_funcs=[eval_harmfulness])
def experiment_entry_point(msg: str) -> str:
return "good word"
```
```typescript TypeScript theme={null}
import { Log, trace } from "parea-ai";
function evalHarmfulness(log: Log): boolean {
return !log.output.includes("bad word");
}
const experimentEntryPoint = trace(
"experimentEntryPoint",
(msg: string): string => {
return "good word";
},
{ evalFuncs: [evalHarmfulness] }
);
```
To ensure that your evaluation metrics are reusable across the entire Parea ecosystem, and with any LLM models or LLM use cases, we introduced the `log` parameter.
All evaluation functions accept the `log` parameter, which provides all the needed information to perform an evaluation.
Evaluation functions are expected to return floating point scores or booleans.
```python theme={null}
class Role(str, Enum):
user = "user"
assistant = "assistant"
system = "system"
class Message:
content: str
role: Role
class ModelParams:
temp: float = 1.0
top_p: float = 1.0
frequency_penalty: float = 0.0
presence_penalty: float = 0.0
max_length: Optional[int] = None
response_format: Optional[dict] = None
class LLMInputs:
# the name of the LLM model. e.g. "gpt-4-1106-preview", "claude-2", etc.
model: Optional[str]
# the name of the LLM provider.
# One of: ["openai", "azure", "anthropic",
# "anyscale", "aws", "vertexai", "openrouter"]
provider: Optional[str]
# the model specific parameters for the LLM call
model_params: Optional[ModelParams]
# the prompts that make up the LLM call,
# e.g. [{"role": "user", "content": "What is the capital of France?"}]
messages: Optional[list[Message]]
# a list of function call JSON schemas following OpenAI format
functions: Optional[list[dict[str, str]]
# the name of the function the LLM should call or auto.
# e.g {"name": "current_weather"} or "auto"
function_call: Optional[Union[str, dict[str, str]]]
class Log:
# all the parameters send the LLM provider
configuration: Optional[LLMInputs]
# The key-value pairs representing an input name
# and the corresponding value,
# e.g. {"query": "What is the capital of France?"}
inputs: Optional[dict[str, str]]
# The output of the LLM call
output: Optional[str]
# The target/ground truth value for the LLM call
target: Optional[str]
```
#### Skipping Evaluation Metrics
Sometimes it's useful to apply evaluation metrics only on a subset of the data.
For that, you return `None`/`null` in the evaluation function to skip the evaluation for that log.
```python Python theme={null}
def my_eval_name(log: Log):
if log.inputs.get("key") == "value-to-skip":
return None
return log.output == log.target
```
```typescript TypeScript theme={null}
function myEvalName(log: Log): boolean | null {
if (log.inputs.key === "value-to-skip") {
return null;
}
return log.output === log.target;
}
```
#### Return a Reason
While numerical scores are useful to get a fast grasp of how good a response is, it's useful to provide a reason for why a response is bad.
Especially, if one uses a LLM-based evaluation metric, it's good to pass on the reasons for why the LLM assigned a certain score.
You can do that by returning an `EvaluationResult` object with a `reason` attribute.
Updating above example:
```python Python theme={null}
def eval_harmfulness(log: Log) -> EvaluationResult:
if "bad word" in log.output:
return EvaluationResult(name="harmfulness", score=0.0, reason="bad word found")
return EvaluationResult(name="harmfulness", score=1.0)
@trace(eval_funcs=[eval_harmfulness])
def experiment_entry_point(msg: str) -> str:
return "good word"
```
```typescript TypeScript theme={null}
function evalHarmfulness(log: Log): EvaluationResult {
if (log.output.includes("bad word")) {
return { name: "harmfulness", score: 0.0, reason: "bad word found" };
}
return { name: "harmfulness", score: 1.0 };
}
const experimentEntryPoint = trace(
"experimentEntryPoint",
(msg: string): string => {
return "good word";
},
{ evalFuncs: [evalHarmfulness] }
);
```
The full-definition of the `EvaluationResult` object is as follows:
```python Python theme={null}
class EvaluationResult:
name: str
score: float
reason: Optional[str] = None
```
```typescript TypeScript theme={null}
type EvaluationResult = {
name: string;
score: number;
reason?: string;
};
```
#### Returning Multiple Scores
Sometimes there is shared work between different evaluation metrics such that returning multiple scores is better.
You can do that by returning a list of `EvaluationResult` objects.
## Running & Naming of Experiments
Depending on whether you use Python or TypeScript, you can name & run experiments in the below ways.
You need to name an experiment and can optionally specify the name of a particular run.
Note, that the run name can only contain alphanumeric characters, dashes, and underscores and needs to be unique within each project.
After an experiment is finished, you will see an overview of the average stats and a link to the experiment page with full details.
In Python, you can define an experiment by calling the `experiment` method of the Parea client `p` and run it by calling the `run` method of the experiment.
You can optionally specify the name of the run by passing it to the `run` method.
```python theme={null}
p.experiment(
name=experiment_name, # name of the experiment
data=data, # test data to run the experiment on (list of dicts)
func=func, # function to run (callable)
).run() # you can optionally specify the run name by passing `run_name` to the run method
```
Alternatively, you can also use the CLI to run an experiment:
```bash theme={null}
parea experiment path/to/experiment_file.py
```
In this case the experiment file should contain the experiment definition but not call the `run` method. You can optionally specify the run name of the experiment using the `--run_name` flag in the CLI.
```python theme={null}
p.experiment(
name=experiment_name, # name of the experiment
data=data, # test data to run the experiment on (list of dicts)
func=func, # function to run (callable)
)
```
In TypeScript, you can define an experiment by calling the `experiment` method of the Parea client `p` and run it by calling the `run` method of the experiment.
You can optionally specify the name of the experiment by passing it to the `run` method.
```typescript theme={null}
const e = p.experiment(
experimentName, // name of the experiment
data, // test data to run the experiment on (list of dicts)
func, // function to run (callable)
);
await e.run(); // you can optionally specify the run name by passing it to the run method
```
### Organization of Experiments & Historical Trends of Evals
Within projects, you can organize your experiments by the experiment name.
You can filter the experiments table by the experiment name to see all runs of that experiment.
This will also filter the graph of historical experiment eval scores by that name.
 ### Organize Experiments by Projects
You can organize your experiments by projects.
By default, all logs, traces & experiments are grouped in the `default` project.
You can specify a project name when you initialize the Parea client.
This will automatically create a new project with that name if it didn't exist before.
Note, that the name of the project is only allowed to contain alphanumeric characters, dashes and underscores.
```python python theme={null}
from parea import Parea
p = Parea(api_key=os.getenv("PAREA_API_KEY"), project_name='my-project')
```
```typescript typescript theme={null}
import {Parea} from "parea-ai";
const p = new Parea("PAREA_API_KEY", 'my-project');
```
You can toggle between projects on the platform by clicking on the project name in the collapsible sidebar on the left.
## Testing Sub-steps
When building RAG applications, it's useful to test the retrieval and generation steps separately to pinpoint what goes wrong.
Similarly, when building agents, one typically wants to test every individual step for the expected output to catch cascading failures.
You can test sub-steps via Parea by attaching the `trace` decorator to the respective functions with the corresponding eval.
This will create scores from every sub-step, when running the entrypoint function (no matter if running an experiment or running the function directly).
To access different targets/expected outputs for sub-steps, you can pass the target as a dictionary when defining the experiment.
Note, that this will convert the target to a string such that you will need to convert it back to a dictionary in the evaluation function in order to access the sub-step target.
See Python & TypeScript examples below.
```python Python theme={null}
import json
import os
from typing import Union
from dotenv import load_dotenv
from parea import Parea, trace
from parea.evals.general.levenshtein import levenshtein_distance
from parea.schemas import Log
load_dotenv()
p = Parea(api_key=os.getenv("PAREA_API_KEY"))
# evaluation function for the substep
def eval_choose_greeting(log: Log) -> Union[float, None]:
if not (target := log.target):
return None
target_substep = json.loads(target)["substep"] # log.target is a string
output = log.output
return levenshtein_distance(target_substep, output)
# sub-step
@trace(eval_funcs=[eval_choose_greeting])
def choose_greeting(name: str) -> str:
return "Hello"
# end-to-end evaluation function
def eval_greet(log: Log) -> Union[float, None]:
if not (target := log.target):
return None
target_overall = json.loads(target)["overall"]
output = log.output
return levenshtein_distance(target_overall, output)
@trace(eval_funcs=[eval_greet])
def greet(name: str) -> str:
greeting = choose_greeting(name)
return f"{greeting} {name}"
data = [
{
"name": "Foo",
"target": {
"overall": "Hi Foo",
"substep": "Hi",
},
},
{
"name": "Bar",
"target": {
"overall": "Hello Bar",
"substep": "Hello",
},
},
]
if __name__ == "__main__":
p.experiment(
name="greeting",
data=data,
func=greet,
).run()
```
```typescript TypeScript theme={null}
import {Parea, trace, levenshteinDistance, Log} from "parea-ai";
import * as dotenv from 'dotenv';
dotenv.config();
const p = new Parea(process.env.PAREA_API_KEY);
// eval function for the subsetp chooseGreeting
const evalChooseGreeting = (log: Log): number | null => {
if (!log?.target) {
return null;
}
const targetSubstep = JSON.parse(log.target).substep;
return levenshteinDistance(log.output || '', targetSubstep);
};
const chooseGreeting = trace(
'chooseGreeting',
// eslint-disable-next-line @typescript-eslint/no-unused-vars
(name: string): string => {
return 'Hello';
},
{
evalFuncs: [evalChooseGreeting],
},
);
// eval function for the greet function
const evalGreet = (log: Log): number | null => {
if (!log?.target) {
return null;
}
const targetOverall = JSON.parse(log.target).overall;
return levenshteinDistance(log.output || '', targetOverall);
};
const greet = trace(
'greetings',
(name: string): string => {
const greeting = chooseGreeting(name);
return `${greeting} ${name}`;
},
{
evalFuncs: [evalGreet],
},
);
export async function main() {
const e = p.experiment(
'greeting',
[
{ name: 'Foo', target: { substep: 'Hi', overall: 'Hi Foo' } },
{ name: 'Bar', target: { substep: 'Hello', overall: 'Hello Bar' } },
],
greet,
);
return await e.run();
}
main().then(() => {
console.log('Experiment complete!');
});
```
## Trials
Given the non-deterministic behavior of LLMs it could be useful to run the evaluation multiple times per input to check response consistency, i.e., to run multiple trials.
You can do that by specifying the `n_trials` parameter when defining an experiment:
```python Python theme={null}
p.experiment(
...,
n_trials=3,
)
```
```typescript TypeScript theme={null}
const e = p.experiment(
...,
{ nTrials: 3 }
);
await e.run();
```
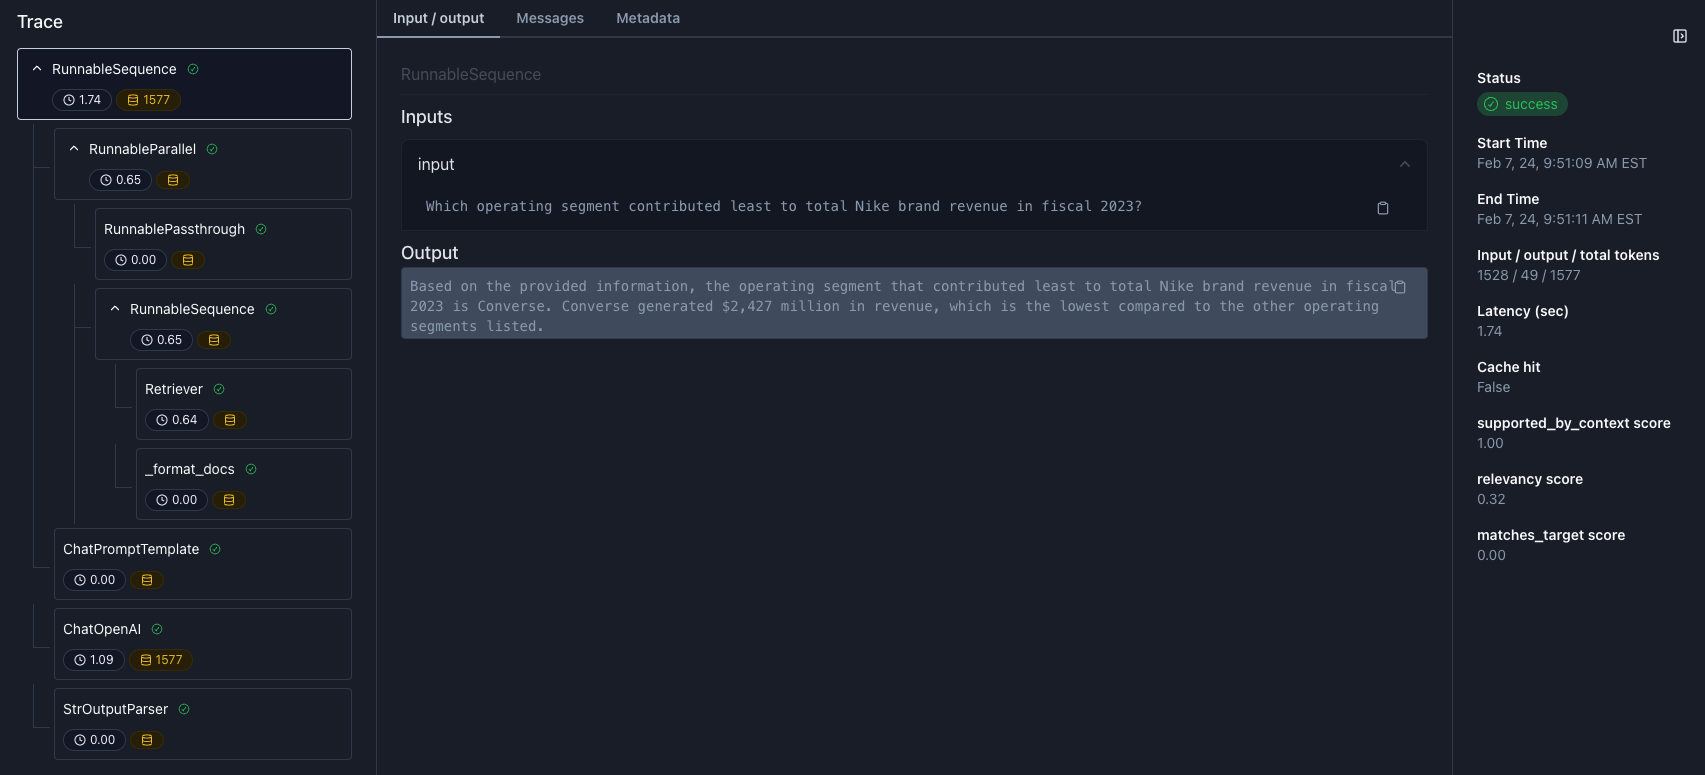
## Debug Individual Traces
You can debug individual traces to understand how your LLM app returned an output on specific inputs.
You do that by clicking on the row in the log table of the experiment.
In the trace view, you can step through the trace (left sidebar), see any inputs, outputs, and metadata (middle) of the selected step,
and view any metrics and scores (right side).
### Organize Experiments by Projects
You can organize your experiments by projects.
By default, all logs, traces & experiments are grouped in the `default` project.
You can specify a project name when you initialize the Parea client.
This will automatically create a new project with that name if it didn't exist before.
Note, that the name of the project is only allowed to contain alphanumeric characters, dashes and underscores.
```python python theme={null}
from parea import Parea
p = Parea(api_key=os.getenv("PAREA_API_KEY"), project_name='my-project')
```
```typescript typescript theme={null}
import {Parea} from "parea-ai";
const p = new Parea("PAREA_API_KEY", 'my-project');
```
You can toggle between projects on the platform by clicking on the project name in the collapsible sidebar on the left.
## Testing Sub-steps
When building RAG applications, it's useful to test the retrieval and generation steps separately to pinpoint what goes wrong.
Similarly, when building agents, one typically wants to test every individual step for the expected output to catch cascading failures.
You can test sub-steps via Parea by attaching the `trace` decorator to the respective functions with the corresponding eval.
This will create scores from every sub-step, when running the entrypoint function (no matter if running an experiment or running the function directly).
To access different targets/expected outputs for sub-steps, you can pass the target as a dictionary when defining the experiment.
Note, that this will convert the target to a string such that you will need to convert it back to a dictionary in the evaluation function in order to access the sub-step target.
See Python & TypeScript examples below.
```python Python theme={null}
import json
import os
from typing import Union
from dotenv import load_dotenv
from parea import Parea, trace
from parea.evals.general.levenshtein import levenshtein_distance
from parea.schemas import Log
load_dotenv()
p = Parea(api_key=os.getenv("PAREA_API_KEY"))
# evaluation function for the substep
def eval_choose_greeting(log: Log) -> Union[float, None]:
if not (target := log.target):
return None
target_substep = json.loads(target)["substep"] # log.target is a string
output = log.output
return levenshtein_distance(target_substep, output)
# sub-step
@trace(eval_funcs=[eval_choose_greeting])
def choose_greeting(name: str) -> str:
return "Hello"
# end-to-end evaluation function
def eval_greet(log: Log) -> Union[float, None]:
if not (target := log.target):
return None
target_overall = json.loads(target)["overall"]
output = log.output
return levenshtein_distance(target_overall, output)
@trace(eval_funcs=[eval_greet])
def greet(name: str) -> str:
greeting = choose_greeting(name)
return f"{greeting} {name}"
data = [
{
"name": "Foo",
"target": {
"overall": "Hi Foo",
"substep": "Hi",
},
},
{
"name": "Bar",
"target": {
"overall": "Hello Bar",
"substep": "Hello",
},
},
]
if __name__ == "__main__":
p.experiment(
name="greeting",
data=data,
func=greet,
).run()
```
```typescript TypeScript theme={null}
import {Parea, trace, levenshteinDistance, Log} from "parea-ai";
import * as dotenv from 'dotenv';
dotenv.config();
const p = new Parea(process.env.PAREA_API_KEY);
// eval function for the subsetp chooseGreeting
const evalChooseGreeting = (log: Log): number | null => {
if (!log?.target) {
return null;
}
const targetSubstep = JSON.parse(log.target).substep;
return levenshteinDistance(log.output || '', targetSubstep);
};
const chooseGreeting = trace(
'chooseGreeting',
// eslint-disable-next-line @typescript-eslint/no-unused-vars
(name: string): string => {
return 'Hello';
},
{
evalFuncs: [evalChooseGreeting],
},
);
// eval function for the greet function
const evalGreet = (log: Log): number | null => {
if (!log?.target) {
return null;
}
const targetOverall = JSON.parse(log.target).overall;
return levenshteinDistance(log.output || '', targetOverall);
};
const greet = trace(
'greetings',
(name: string): string => {
const greeting = chooseGreeting(name);
return `${greeting} ${name}`;
},
{
evalFuncs: [evalGreet],
},
);
export async function main() {
const e = p.experiment(
'greeting',
[
{ name: 'Foo', target: { substep: 'Hi', overall: 'Hi Foo' } },
{ name: 'Bar', target: { substep: 'Hello', overall: 'Hello Bar' } },
],
greet,
);
return await e.run();
}
main().then(() => {
console.log('Experiment complete!');
});
```
## Trials
Given the non-deterministic behavior of LLMs it could be useful to run the evaluation multiple times per input to check response consistency, i.e., to run multiple trials.
You can do that by specifying the `n_trials` parameter when defining an experiment:
```python Python theme={null}
p.experiment(
...,
n_trials=3,
)
```
```typescript TypeScript theme={null}
const e = p.experiment(
...,
{ nTrials: 3 }
);
await e.run();
```
## Debug Individual Traces
You can debug individual traces to understand how your LLM app returned an output on specific inputs.
You do that by clicking on the row in the log table of the experiment.
In the trace view, you can step through the trace (left sidebar), see any inputs, outputs, and metadata (middle) of the selected step,
and view any metrics and scores (right side).
 ## Use Saved Datasets
When running and experiment, you can use your datasets saved on Parea.
For the data field just provide the name of the dataset as defined on the [Datasets tab](https://app.parea.ai/datasets).
The dataset should have column names that match the input parameters of the function you are running the experiment on.
Note, the dataset name will be automatically stored in the "Dataset" key for the experiment metadata.
```python Python theme={null}
p.experiment(
name='Experiment Name',
data="Dataset Name",
func=func,
)
```
```typescript TypeScript theme={null}
const e = p.experiment(
'Experiment Name',
'Dataset Name',
func,
);
```
## Dataset Level Evaluation
Sometimes it's useful to aggregate the evaluation scores over the entire dataset, e.g., for balanced accuracy. You can
do that by specifying the `dataset_level_evals` or `datasetLevelEvals` parameter when defining an experiment:
```python Python theme={null}
p.experiment(
...,
dataset_level_evals=[...], # list of evaluation functions applied on the entire dataset
)
```
```typescript TypeScript theme={null}
p.experiment(
...,
{ datasetLevelEvals: [...] } // list of evaluation functions applied on the entire dataset
);
```
The evaluation functions will receive a list of `EvaluatedLog` objects and are expected to return a single floating point score or a boolean.
The `EvaluatedLog` object is a subclass of the `Log` object with the additional `scores` attribute.
The scores will be attached to the Experiment and can be viewed in the overview table and the detailed view of the experiment.
```python theme={null}
class EvaluationResult:
name: str
score: float
class EvaluatedLog(Log):
scores: Optional[list[EvaluationResult]] = None
```
```python Python theme={null}
import os
from collections import defaultdict
from dotenv import load_dotenv
from parea import Parea, trace
from parea.schemas import EvaluatedLog, Log
load_dotenv()
p = Parea(api_key=os.getenv("PAREA_API_KEY"))
def is_correct(log: Log) -> bool:
return log.target == log.output
def balanced_acc_is_correct(logs: list[EvaluatedLog]) -> float:
score_name = is_correct.__name__
correct = defaultdict(int)
total = defaultdict(int)
for log in logs:
if (eval_result := log.get_score(score_name)) is not None:
correct[log.target] += int(eval_result.score)
total[log.target] += 1
recalls = [correct[key] / total[key] for key in correct]
return sum(recalls) / len(recalls)
@trace(eval_funcs=[is_correct])
def starts_with_f(name: str) -> str:
if name == "Foo":
return "1"
return "0"
data = [
{
"name": "Foo",
"target": "1",
},
{
"name": "Bar",
"target": "0",
},
{
"name": "Far",
"target": "1",
},
] # test data to run the experiment on (list of dicts)
# You can optionally run the experiment manually by calling `.run()`
if __name__ == "__main__":
p.experiment(
name='Dataset Level Evals', data=data, func=starts_with_f, dataset_level_evals=[balanced_acc_is_correct]
).run()
```
```typescript TypeScript theme={null}
import * as dotenv from 'dotenv';
import { Parea, trace, EvaluatedLog, Log } from 'parea-ai';
dotenv.config();
const p = new Parea(process.env.PAREA_API_KEY);
function isCorrect(log: Log): number {
return log?.output === log.target ? 1 : 0;
}
const startsWithF = trace(
'startsWithF',
(name: string): string => {
if (name === 'Foo') {
return '1';
} else {
return '0';
}
},
{
evalFuncs: [isCorrect],
},
);
function balancedAccIsCorrect(logs: EvaluatedLog[]): number {
const scoreName: string = isCorrect.name;
const correct: Record = {};
const total: Record = {};
for (const log of logs) {
const evalResult = log?.scores?.find((score) => score.name === scoreName) || null;
const target: string = log.target || '';
if (evalResult !== null && target !== null) {
correct[target] = (correct[target] || 0) + (evalResult.score ? 1 : 0);
total[target] = (total[target] || 0) + 1;
}
}
const recalls: number[] = Object.keys(correct).map((key) => correct[key] / total[key]);
if (recalls.length === 0) {
return 0;
}
return recalls.reduce((acc, curr) => acc + curr, 0) / recalls.length;
}
export async function main() {
const e = p.experiment(
'Dataset Level Eval Example', // Name of the experiment
[
{ name: 'Foo', target: '1' },
{ name: 'Bar', target: '0' },
{ name: 'Far', target: '1' },
], // Data to run the experiment on (list of dicts)
startsWithF, // Function to run (callable),
{
datasetLevelEvalFuncs: [balancedAccIsCorrect],
},
);
return await e.run();
}
main().then(() => {
console.log('Experiment complete!');
});
```
To simplify the process of defining dataset level evaluations, Parea provides a set of pre-built dataset level evaluations:
* `balanced_accuracy`: The balanced accuracy of a score for the experiment; more [here](/api-reference/sdk/python#balanced-acc-factory)
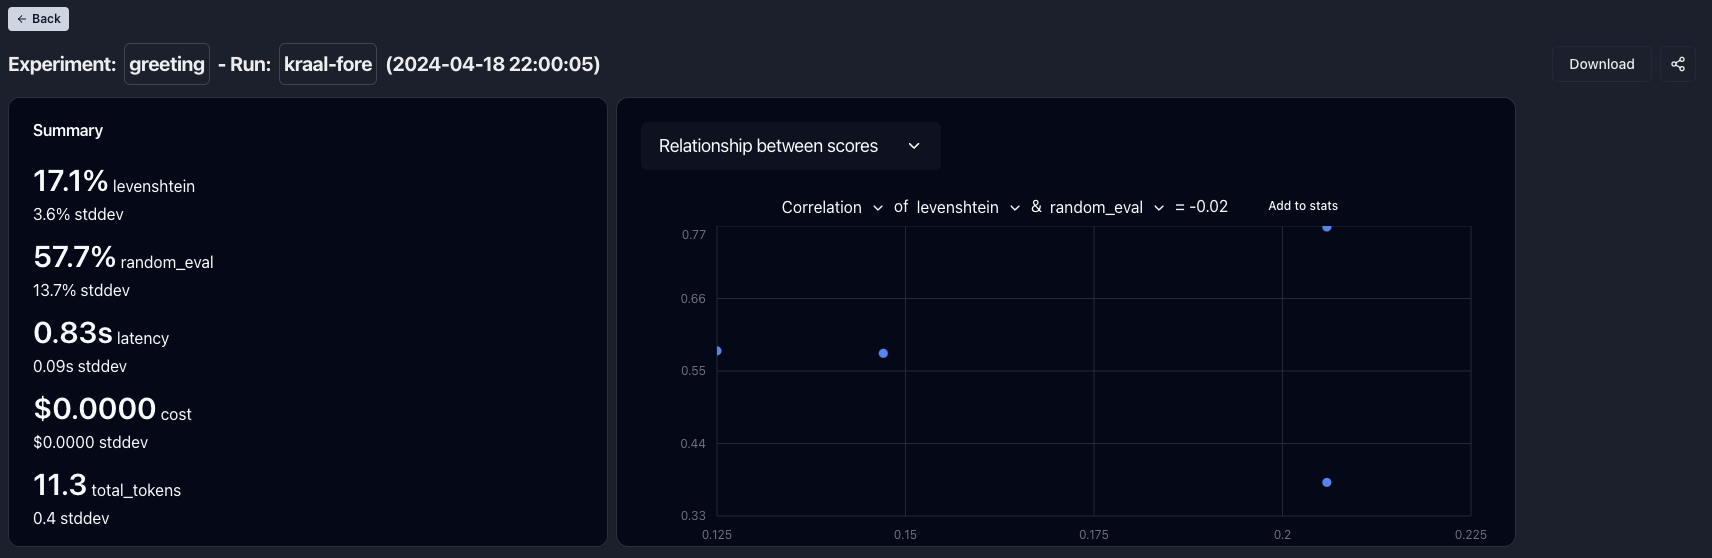
## Investigating Relationship Between Statistics
Sometimes it is useful to understand the relationship between different evaluation metrics, and, [manual annotations](/manual-review/overview).
An example would be to assess how well your eval correlations / agrees with manual annotations.
You can view a scatter plot of the relationship between two stats by selecting "Relationship between scores" in the dropdown above the graph in the detailed experiment view.
Additionally, you can view the accuracy & correlation between the two selected variables and add that value to the experiment scores.
Going back to the example of assessing how much your eval agrees with manual annotations, you can now track the quality of your eval over time and align it better with manual annotations.
## Use Saved Datasets
When running and experiment, you can use your datasets saved on Parea.
For the data field just provide the name of the dataset as defined on the [Datasets tab](https://app.parea.ai/datasets).
The dataset should have column names that match the input parameters of the function you are running the experiment on.
Note, the dataset name will be automatically stored in the "Dataset" key for the experiment metadata.
```python Python theme={null}
p.experiment(
name='Experiment Name',
data="Dataset Name",
func=func,
)
```
```typescript TypeScript theme={null}
const e = p.experiment(
'Experiment Name',
'Dataset Name',
func,
);
```
## Dataset Level Evaluation
Sometimes it's useful to aggregate the evaluation scores over the entire dataset, e.g., for balanced accuracy. You can
do that by specifying the `dataset_level_evals` or `datasetLevelEvals` parameter when defining an experiment:
```python Python theme={null}
p.experiment(
...,
dataset_level_evals=[...], # list of evaluation functions applied on the entire dataset
)
```
```typescript TypeScript theme={null}
p.experiment(
...,
{ datasetLevelEvals: [...] } // list of evaluation functions applied on the entire dataset
);
```
The evaluation functions will receive a list of `EvaluatedLog` objects and are expected to return a single floating point score or a boolean.
The `EvaluatedLog` object is a subclass of the `Log` object with the additional `scores` attribute.
The scores will be attached to the Experiment and can be viewed in the overview table and the detailed view of the experiment.
```python theme={null}
class EvaluationResult:
name: str
score: float
class EvaluatedLog(Log):
scores: Optional[list[EvaluationResult]] = None
```
```python Python theme={null}
import os
from collections import defaultdict
from dotenv import load_dotenv
from parea import Parea, trace
from parea.schemas import EvaluatedLog, Log
load_dotenv()
p = Parea(api_key=os.getenv("PAREA_API_KEY"))
def is_correct(log: Log) -> bool:
return log.target == log.output
def balanced_acc_is_correct(logs: list[EvaluatedLog]) -> float:
score_name = is_correct.__name__
correct = defaultdict(int)
total = defaultdict(int)
for log in logs:
if (eval_result := log.get_score(score_name)) is not None:
correct[log.target] += int(eval_result.score)
total[log.target] += 1
recalls = [correct[key] / total[key] for key in correct]
return sum(recalls) / len(recalls)
@trace(eval_funcs=[is_correct])
def starts_with_f(name: str) -> str:
if name == "Foo":
return "1"
return "0"
data = [
{
"name": "Foo",
"target": "1",
},
{
"name": "Bar",
"target": "0",
},
{
"name": "Far",
"target": "1",
},
] # test data to run the experiment on (list of dicts)
# You can optionally run the experiment manually by calling `.run()`
if __name__ == "__main__":
p.experiment(
name='Dataset Level Evals', data=data, func=starts_with_f, dataset_level_evals=[balanced_acc_is_correct]
).run()
```
```typescript TypeScript theme={null}
import * as dotenv from 'dotenv';
import { Parea, trace, EvaluatedLog, Log } from 'parea-ai';
dotenv.config();
const p = new Parea(process.env.PAREA_API_KEY);
function isCorrect(log: Log): number {
return log?.output === log.target ? 1 : 0;
}
const startsWithF = trace(
'startsWithF',
(name: string): string => {
if (name === 'Foo') {
return '1';
} else {
return '0';
}
},
{
evalFuncs: [isCorrect],
},
);
function balancedAccIsCorrect(logs: EvaluatedLog[]): number {
const scoreName: string = isCorrect.name;
const correct: Record = {};
const total: Record = {};
for (const log of logs) {
const evalResult = log?.scores?.find((score) => score.name === scoreName) || null;
const target: string = log.target || '';
if (evalResult !== null && target !== null) {
correct[target] = (correct[target] || 0) + (evalResult.score ? 1 : 0);
total[target] = (total[target] || 0) + 1;
}
}
const recalls: number[] = Object.keys(correct).map((key) => correct[key] / total[key]);
if (recalls.length === 0) {
return 0;
}
return recalls.reduce((acc, curr) => acc + curr, 0) / recalls.length;
}
export async function main() {
const e = p.experiment(
'Dataset Level Eval Example', // Name of the experiment
[
{ name: 'Foo', target: '1' },
{ name: 'Bar', target: '0' },
{ name: 'Far', target: '1' },
], // Data to run the experiment on (list of dicts)
startsWithF, // Function to run (callable),
{
datasetLevelEvalFuncs: [balancedAccIsCorrect],
},
);
return await e.run();
}
main().then(() => {
console.log('Experiment complete!');
});
```
To simplify the process of defining dataset level evaluations, Parea provides a set of pre-built dataset level evaluations:
* `balanced_accuracy`: The balanced accuracy of a score for the experiment; more [here](/api-reference/sdk/python#balanced-acc-factory)
## Investigating Relationship Between Statistics
Sometimes it is useful to understand the relationship between different evaluation metrics, and, [manual annotations](/manual-review/overview).
An example would be to assess how well your eval correlations / agrees with manual annotations.
You can view a scatter plot of the relationship between two stats by selecting "Relationship between scores" in the dropdown above the graph in the detailed experiment view.
Additionally, you can view the accuracy & correlation between the two selected variables and add that value to the experiment scores.
Going back to the example of assessing how much your eval agrees with manual annotations, you can now track the quality of your eval over time and align it better with manual annotations.
 ## Sharing Experiments Publicly
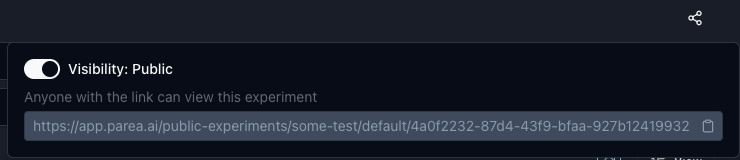
All your experiments are shared by default in your organization and not publicly accessible.
You can share experiments publicly by clicking on the `Share` button on the top right of the experiment page. This
will generate a link following the format
`https://app.parea.ai/public-experiments///` which anyone can access.
You can compare all public experiments in a project under `https://app.parea.ai/public-experiments//`.
## Sharing Experiments Publicly
All your experiments are shared by default in your organization and not publicly accessible.
You can share experiments publicly by clicking on the `Share` button on the top right of the experiment page. This
will generate a link following the format
`https://app.parea.ai/public-experiments///` which anyone can access.
You can compare all public experiments in a project under `https://app.parea.ai/public-experiments//`.
 ## Experiment Code Management
As you iterate on your LLM app and test the changes, keeping track of which change led to which result is cumbersome.
For that Parea provides an integration with [DVC](https://dvc.org)'s experiment tracking.
This enables you to iterate on your LLM app without polluting your git history with a commit for every experiment and still have the ability to revert your code to the state of any experiment.
Once integrated, every time you run an experiment, the state of the workspace together with the associated metrics will be automatically captured.
This will enable you to compare experiment metrics and to revert your workspace to the state of them.
This is currently only supported for Python. Please, reach out if you want that functionality for TypeScript.
Install [DVC](https://dvc.org/doc/install) and initialize it via
```bash theme={null}
dvc init
```
Run the following command to integrate Parea with DVC and commit any files to git which the command creates:
```bash theme={null}
parea dvc-init
```
This command will check if DVC is installed as well as create a `.parea` directory with a `dvc.yaml` and a `metrics.json` file if they don't exist.
The `dvc.yaml` file will point to the `metrics.json` file and the `metrics.json` file will contain the metrics of the experiments.
Both files are necessary for DVC. You can always re-run the command to check if the integration is set up properly.
After integrating Parea with DVC, every time you run an experiment, Parea will capture the state of the workspace together with the associated metrics.
To compare all ran experiments since the last commit you can run the following command and get below output:
```bash theme={null}
dvc exp show
```
## Experiment Code Management
As you iterate on your LLM app and test the changes, keeping track of which change led to which result is cumbersome.
For that Parea provides an integration with [DVC](https://dvc.org)'s experiment tracking.
This enables you to iterate on your LLM app without polluting your git history with a commit for every experiment and still have the ability to revert your code to the state of any experiment.
Once integrated, every time you run an experiment, the state of the workspace together with the associated metrics will be automatically captured.
This will enable you to compare experiment metrics and to revert your workspace to the state of them.
This is currently only supported for Python. Please, reach out if you want that functionality for TypeScript.
Install [DVC](https://dvc.org/doc/install) and initialize it via
```bash theme={null}
dvc init
```
Run the following command to integrate Parea with DVC and commit any files to git which the command creates:
```bash theme={null}
parea dvc-init
```
This command will check if DVC is installed as well as create a `.parea` directory with a `dvc.yaml` and a `metrics.json` file if they don't exist.
The `dvc.yaml` file will point to the `metrics.json` file and the `metrics.json` file will contain the metrics of the experiments.
Both files are necessary for DVC. You can always re-run the command to check if the integration is set up properly.
After integrating Parea with DVC, every time you run an experiment, Parea will capture the state of the workspace together with the associated metrics.
To compare all ran experiments since the last commit you can run the following command and get below output:
```bash theme={null}
dvc exp show
```
 To revert the code to the state of an experiment run the following using the run name of the experiment:
```bash theme={null}
dvc exp apply
```
You can learn more about `dvc exp show` [here](https://dvc.org/doc/command-reference/exp/show), and `dvc exp apply` [here](https://dvc.org/doc/command-reference/exp/apply).
## Add Metadata to Experiments
When running an experiment, you can add metadata to the experiment by passing a dictionary. These metadata will be
displayed on the experiment overview table and can be used to filter and search for experiments.
```python Python theme={null}
p.experiment(
...,
metadata={"Dataset": "Hello World Test"},
).run()
```
```typescript TypeScript theme={null}
const e = p.experiment(
...,
{ metadata: { Dataset: "Hello World Test" } },
);
await e.run();
```
To revert the code to the state of an experiment run the following using the run name of the experiment:
```bash theme={null}
dvc exp apply
```
You can learn more about `dvc exp show` [here](https://dvc.org/doc/command-reference/exp/show), and `dvc exp apply` [here](https://dvc.org/doc/command-reference/exp/apply).
## Add Metadata to Experiments
When running an experiment, you can add metadata to the experiment by passing a dictionary. These metadata will be
displayed on the experiment overview table and can be used to filter and search for experiments.
```python Python theme={null}
p.experiment(
...,
metadata={"Dataset": "Hello World Test"},
).run()
```
```typescript TypeScript theme={null}
const e = p.experiment(
...,
{ metadata: { Dataset: "Hello World Test" } },
);
await e.run();
```
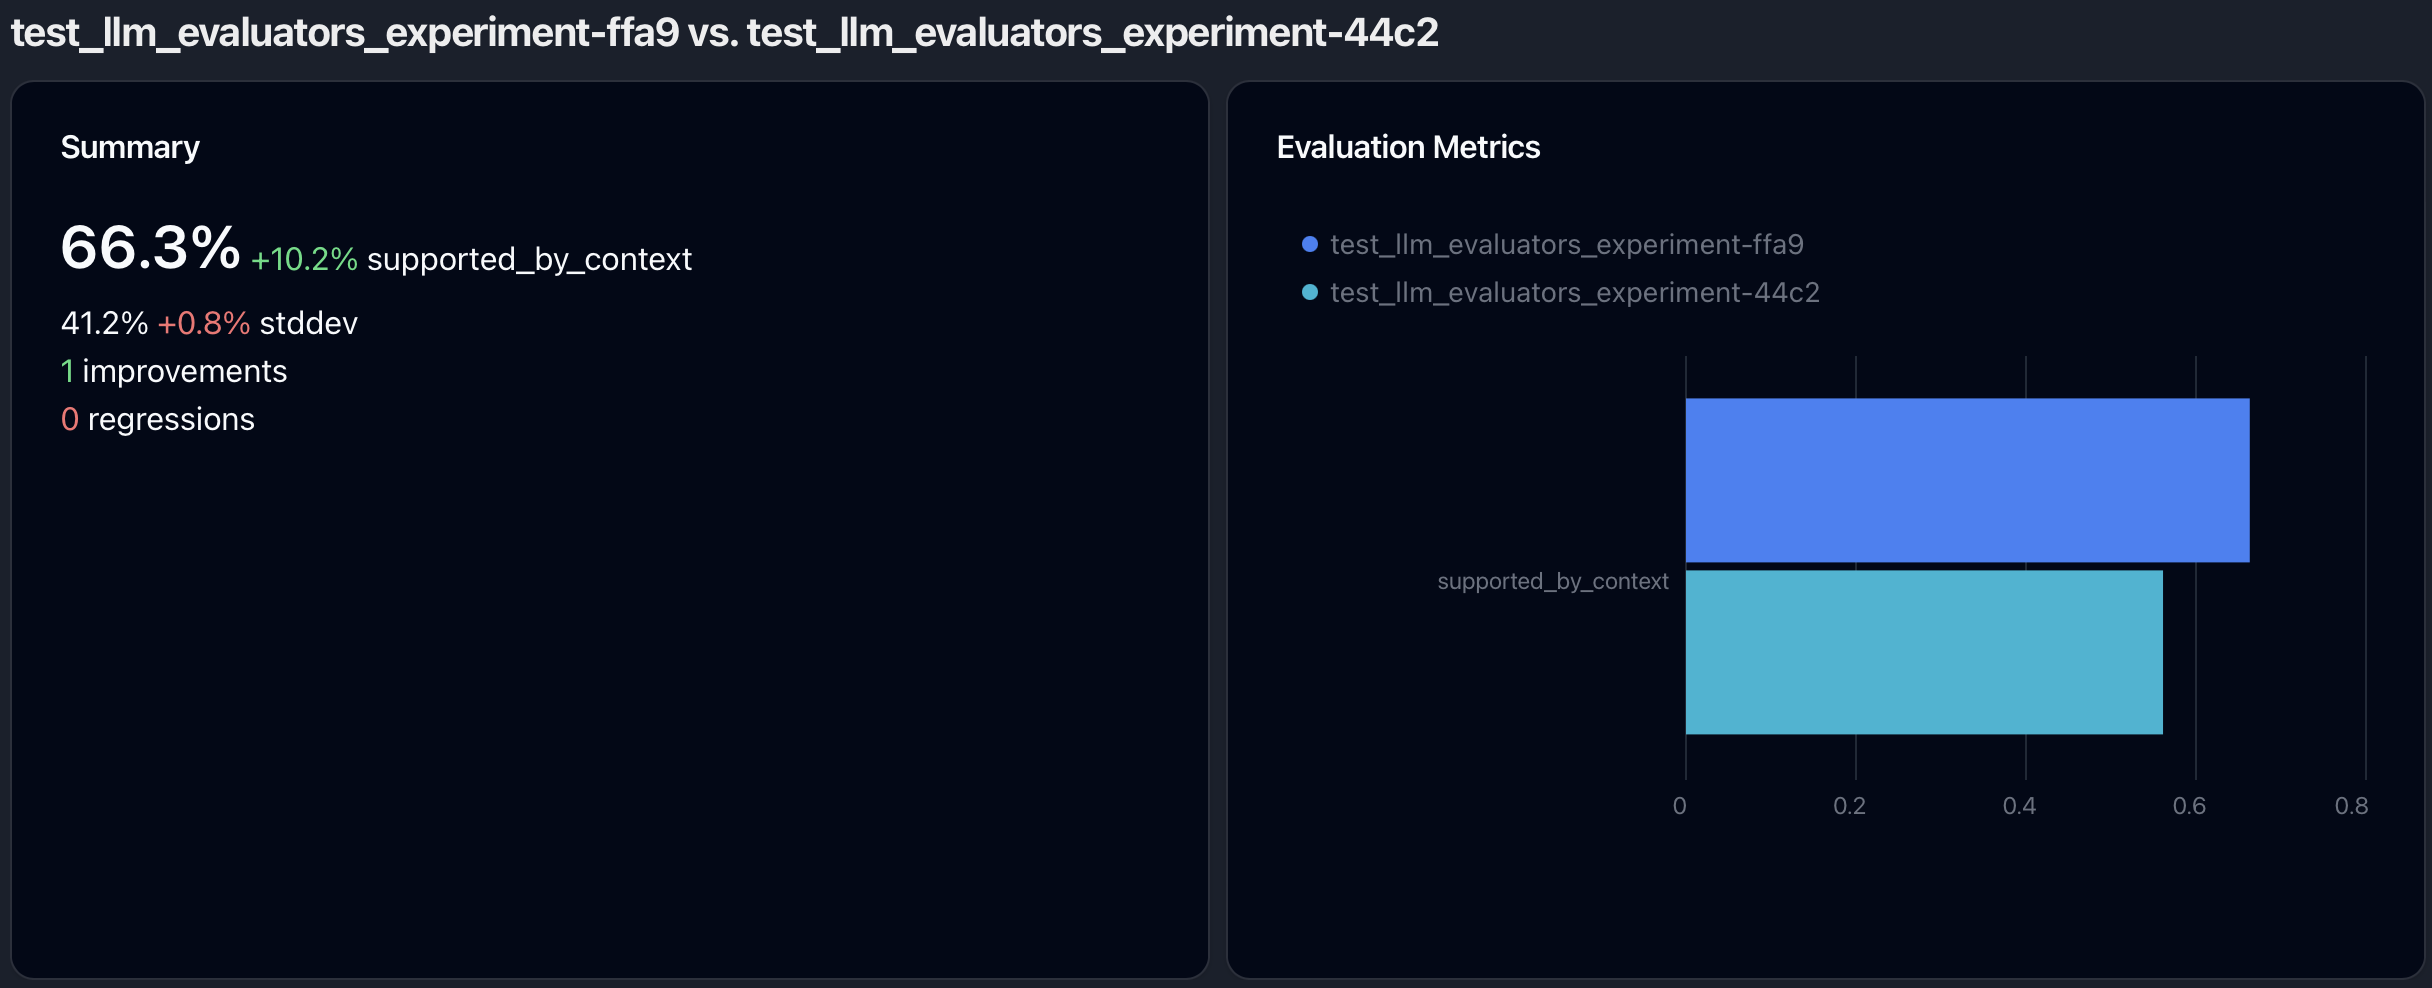
 ## Comparing Experiments
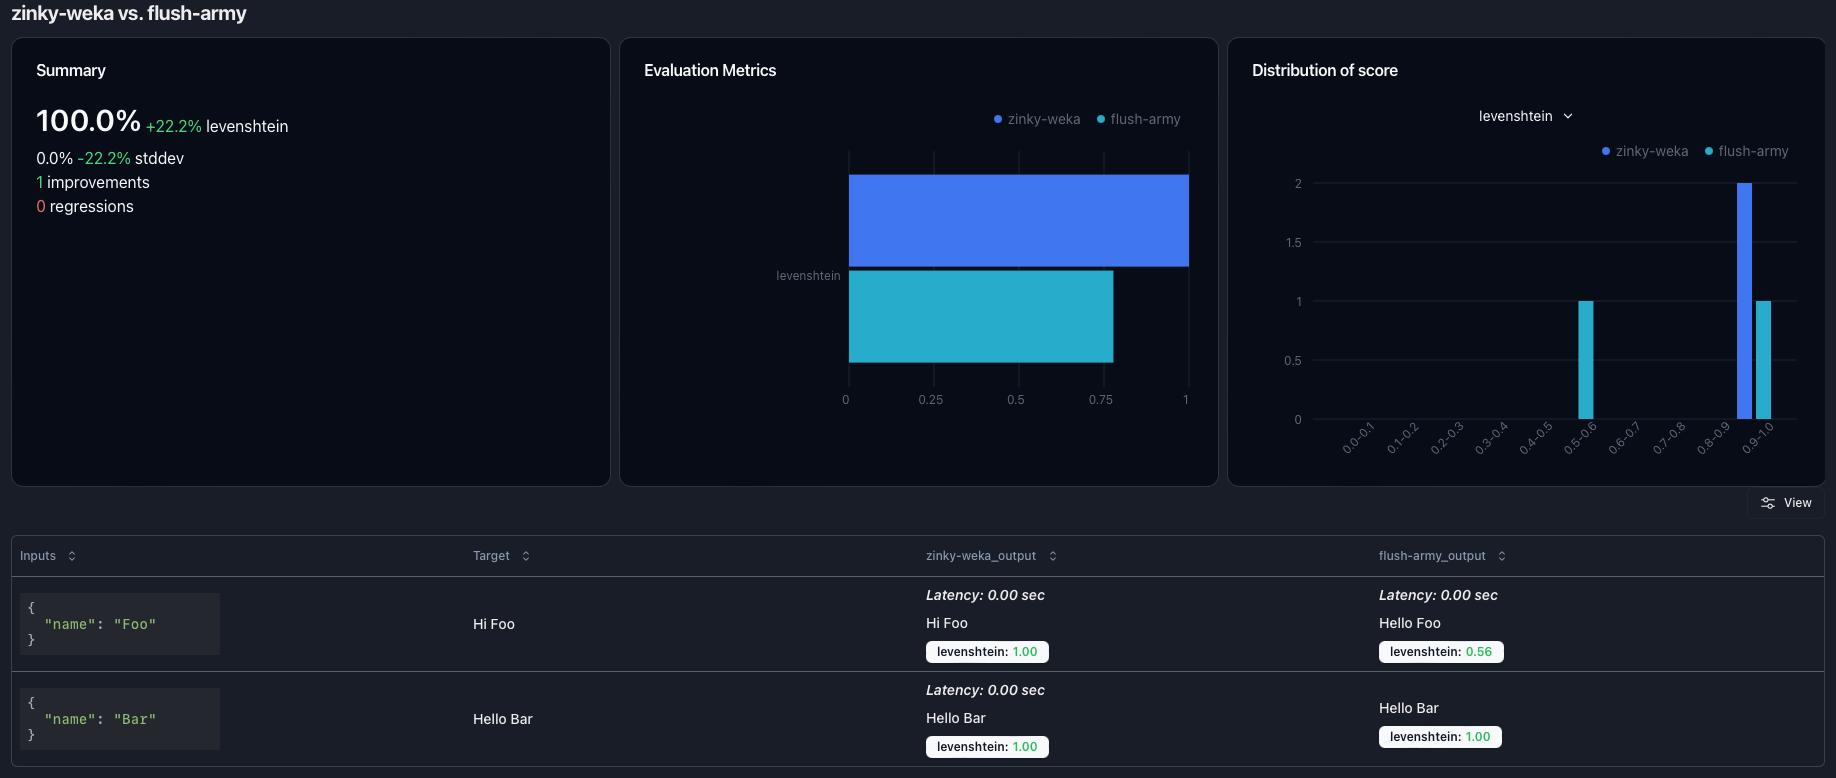
You can select 2 or more experiments in the experiment overview section and click on the `Compare` button to compare them.
This will open up a new view which shows
a high-level comparison of the experiment scores at the top and
a side-by-side view of the individual results of the experiments on the same samples at the bottom.
The high-level comparison consists of 2-3 cards.
The first card is only shown if 2 experiments are compared,
and it displays for every evaluation metric how average and standard deviation have changed as well as the number of improvements and regressions.
The second card compares the evaluation metric averages for every experiment as a bar plot.
The third card shows the distribution plot of the selected evaluation metric as a histogram.
## Comparing Experiments
You can select 2 or more experiments in the experiment overview section and click on the `Compare` button to compare them.
This will open up a new view which shows
a high-level comparison of the experiment scores at the top and
a side-by-side view of the individual results of the experiments on the same samples at the bottom.
The high-level comparison consists of 2-3 cards.
The first card is only shown if 2 experiments are compared,
and it displays for every evaluation metric how average and standard deviation have changed as well as the number of improvements and regressions.
The second card compares the evaluation metric averages for every experiment as a bar plot.
The third card shows the distribution plot of the selected evaluation metric as a histogram.
 ## Controlling Parallelism
You can specify on how many samples your experiment should be executed in parallel by setting the `n_workers` / `nWorkers` parameter when defining an experiment.
```python Python theme={null}
p.experiment(
...,
n_workers=3,
)
```
```typescript TypeScript theme={null}
p.experiment(
...,
{ nWorkers: 3 },
);
```
## Integrate into CI/CD
After creating an experiment and evaluating your LLM app, you can integrate the experiment into your CI/CD pipeline as a test.
```python Python theme={null}
e = p.experiment(
name="CI/CD",
data=data,
func=func,
)
e.run()
assert all(score > 0.5 for score in e.avg_scores.values()), "Some scores are below 0.5"
```
```typescript TypeScript theme={null}
import { expect, test } from "vitest";
test("Run Evaluation", async () => {
const e = p.experiment(
'CI/CD',
data,
func,
);
await e.run();
// Make sure each score is above 0.5
Object.values(e.avgScores ?? {}).forEach((score) =>
expect(score.score).toBeGreaterThan(0.5),
);
}, 1000000 /* timeout */);
```
## Running Experiments in Jupyter Notebooks
In order to execute experiments in a Jupyter notebook, you will need to install `nest-asyncio` and apply it:
```python theme={null}
!pip install nest-asyncio
import nest_asyncio
nest_asyncio.apply()
```
## Controlling Parallelism
You can specify on how many samples your experiment should be executed in parallel by setting the `n_workers` / `nWorkers` parameter when defining an experiment.
```python Python theme={null}
p.experiment(
...,
n_workers=3,
)
```
```typescript TypeScript theme={null}
p.experiment(
...,
{ nWorkers: 3 },
);
```
## Integrate into CI/CD
After creating an experiment and evaluating your LLM app, you can integrate the experiment into your CI/CD pipeline as a test.
```python Python theme={null}
e = p.experiment(
name="CI/CD",
data=data,
func=func,
)
e.run()
assert all(score > 0.5 for score in e.avg_scores.values()), "Some scores are below 0.5"
```
```typescript TypeScript theme={null}
import { expect, test } from "vitest";
test("Run Evaluation", async () => {
const e = p.experiment(
'CI/CD',
data,
func,
);
await e.run();
// Make sure each score is above 0.5
Object.values(e.avgScores ?? {}).forEach((score) =>
expect(score.score).toBeGreaterThan(0.5),
);
}, 1000000 /* timeout */);
```
## Running Experiments in Jupyter Notebooks
In order to execute experiments in a Jupyter notebook, you will need to install `nest-asyncio` and apply it:
```python theme={null}
!pip install nest-asyncio
import nest_asyncio
nest_asyncio.apply()
```