This is the Markdown version of a Google Colab tutorial here.
- Composable and declarative APIs to describe the architecture of LLM application in the form of a “module” (similar to PyTorch’s
nn.Module), - Optimizers formerly known as “teleprompters” that optimize a module for a given task. The optimization could involve selecting few-shot examples, generating prompts, or fine-tuning language models.
- Build and optimize DSPy modules that use retrieval-augmented generation and multi-hop reasoning to answer questions over AirBnB 2023 10k filings dataset,
- Instrument your application using Parea AI,
- Inspect the traces of your application to understand the inner works of a DSPy forward pass.
- Evaluate your modules
- Understand how many samples are necessary to achieve good performance on the test set.
This notebook requires an OpenAI API key and a Parea API key, which can be created here.
1. Install Dependencies and Import Libraries
Install Parea, DSPy, ChromaDB, and other dependencies.2. Configure Your OpenAI & Parea API Key
Set your OpenAI & Parea API key if they are not already set as environment variables.3. Configure LM
We will usegpt-3.5-turbo as our LLM of choice for this tutorial.
4. Load & Index Data
Next we will download Virat’s processed AirBnB 2023 10k filings dataset. This dataset contains 100 triplets of question, relevant context, and answer from AirBnB’s 2023 10k filings. We will store the contexts in ChromaDB to fetch those to when trying to answer a question.dspy.Example objects and mark the question field as the input field. Then, we can split the data into a training and test set.
5. Define A Simple RAG Module
In order to define the RAG module, we need to define a signature that takes in two inputs,context and question, and outputs an answer. The signature provides:
- A description of the sub-task the language model is supposed to solve.
- A description of the input fields to the language model.
- A description of the output fields the language model must produce.
dspy.Module and overriding the forward method. Here, we use ChromaDB to retrieve the top-k passages from the context and then use the Chain-of-Thought generate the final answer.
6. Evaluate the RAG Module
We will use Parea to evaluate the RAG module on the test set. This consists of two parts:- instrumentation: We will trace the execution of the module components to understand how the module processes the input: done by the
trace_dspymethod. - experimentation: We will run an experiment to see the model’s performance on the test set.
nest_asyncio module.
dspy.evaluate.answer_exact_match: checks if the predicted answer is an exact match with the target answer.gold_passages_retrieved: checks if the retrieved context matches the golden context.
dspy.Examples into a list of dictionaries and also attach the evaluation metric to the module such that we can execute the experiment with Parea. We can do the former via convert_dspy_examples_to_parea_dicts and the latter via attach_evals_to_module.
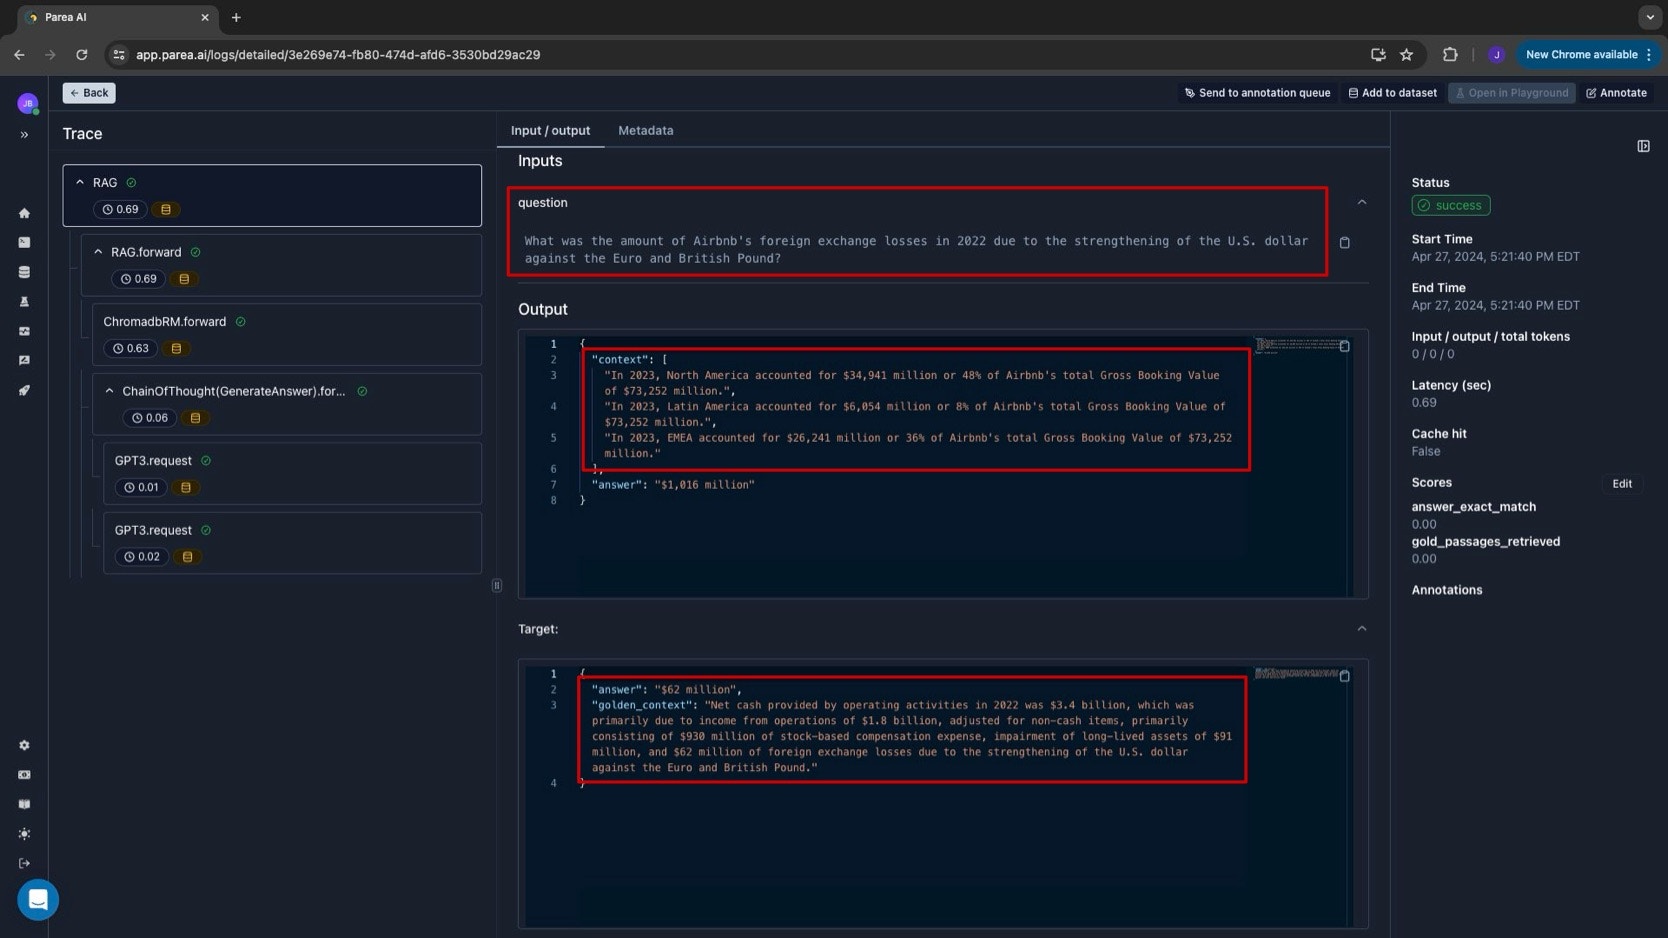
gold_passages_retrieved) and the overall accuracy of our RAG pipeline (answer_exact_match), we can see our retrieval step is the bottleneck (e.g. both metrics agree in 90% of cases).
7. We need better retrieval: Simplified Baleen
One way to improve this to iteratively refine the query given already retrieved contexts before generating a final answer. This is encapsulated in standard NLP by multi-hop search systems, c.f. e.g. Baleen (Khattab et al., 2021). Let’s try it out! For that we will introduce a newSignature: given some context and a question, generate a new query to find more relevant information.
forward pass:
- Loop
self.max_hopstimes to fetch diverse contexts. In each iteration:- Generate a search query using Chain-of-Thought (the predictor at
self.generate_query[hop]). - Then, retrieve the top-k passages using that query.
- Finally, add the (deduplicated) passages to our accumulated context.
- Generate a search query using Chain-of-Thought (the predictor at
- After the loop,
self.generate_answergenerates an answer via CoT. - Finally, return a prediction with the retrieved context and predicted answer.
ChromadbRM outside of the module declaration to ensure that the module is pickleable, which is a requirement to optimize it later on.
8. Optimizing the Baleen Model
Now, we can apply the magic of DSPy and optimize our model on our training set. For that we need to select an optimizer and define an evaluation metric. As optimizer, we will choose theBootstrapFewShot optimizer which uses few-shot examples to boost the performance of the prompts. To evaluate the pipeline we will apply the following logic:
- check if the predicted answer is an exact match with the target answer
- check if the retrieved context matches the golden context
- check if the queries for the individual hops aren’t too long
- check if the queries are sufficiently different from each other
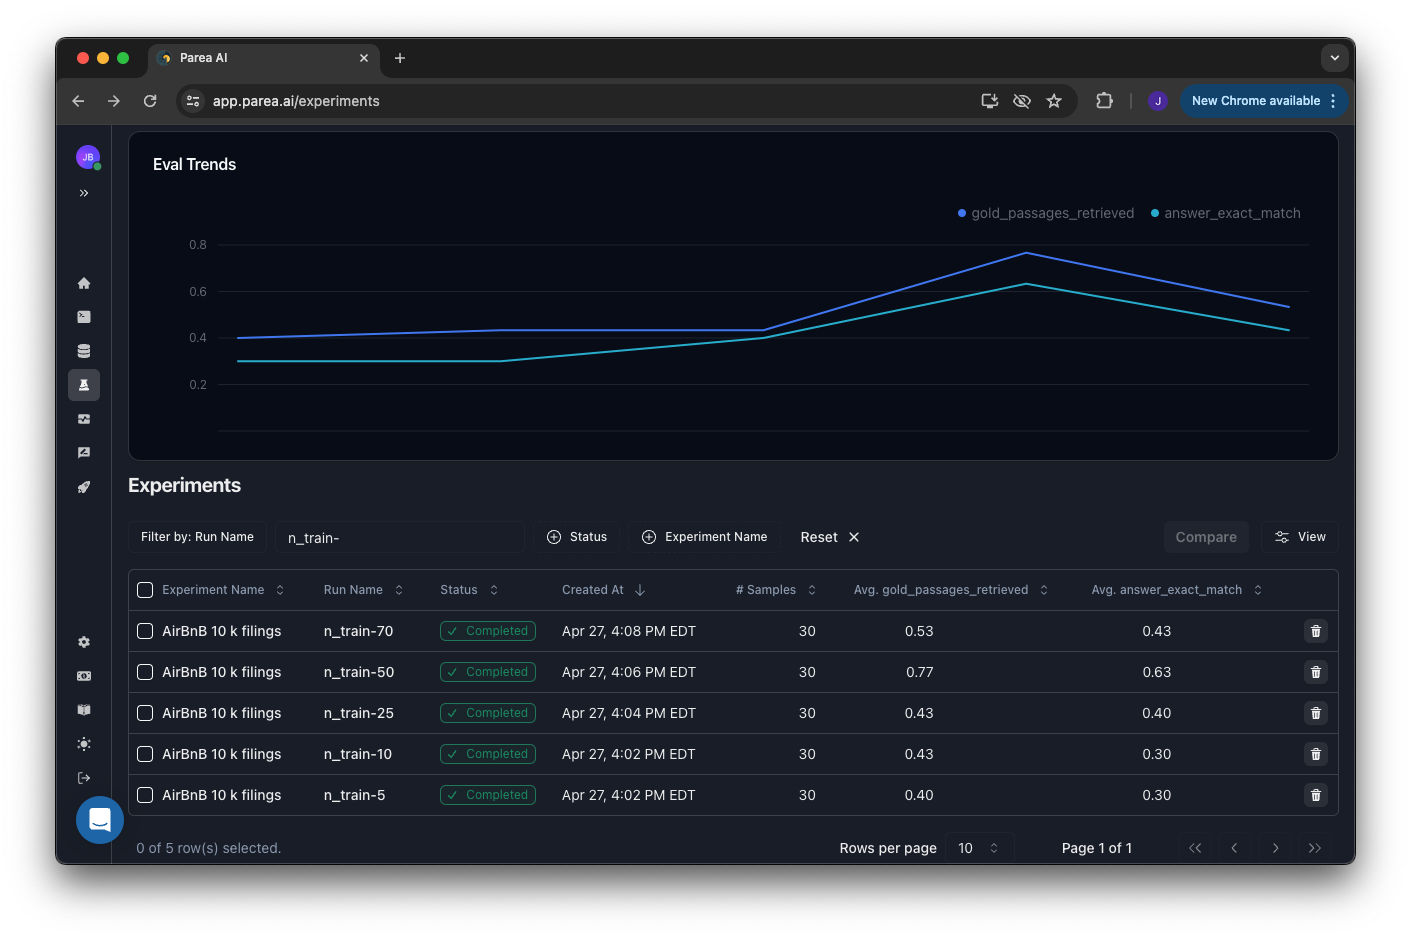
9. Ablation on Training Samples: How Many Samples Are Necessary?
Finally, let’s see how many samples are actually necessary to achieve a performance improvement. For that we will repeat the optimization with 5, 10, 25, 50, and all training samples.